How They’re Created
- Allow plenty of time for your project. Each scarf may take anywhere from 7 to 20 hours to complete. This includes coming up with the drawings for the design in addition to the process listed below.
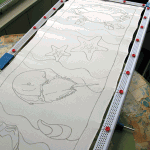
- A pre-rolled hemmed 100% silk scarf is washed in commercial textile detergent to get rid of any gummy residue left over by the silk worms. It is then stretched over a frame using silk pins until taunt.
- The design is lightly drawn in pencil and then gutta resist is applied by squeezing a bottle with a metal tip over the pencil outlines.
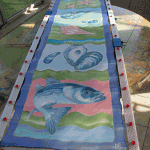
- When the gutta is dry—the painting begins! Make sure the dye is dry before trying to remove the scarf from the stretcher. It doesn’t hurt to wait a day.
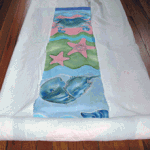
- Take the dried scarf and place on a muslin cloth. Make sure there is plenty of material to fold over the top, sides and bottom. Begin loosely rolling up the scarf being careful to not make wrinkles or having one piece of the scarf touching another. This could cause a transfer of color. Once you get to the end, pick up the roll and roll it in the other direction to form a spiral. It will be round.
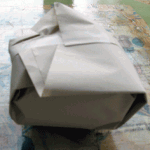
- Tightly wrap a layer of paper around it the ball. Tape it in place. This provides an extra layer of protection.
- You can purchase a professional steamer or try the following method which will set only one scarf at a time. Use a large inexpensive stock pot (that you will never use to cook in) and fill with about 1.5 to 1.75 inches of water. Place two cans with the tops and bottoms removed (so steam can flow through them) in the water and balance a rack on top of them. Put the encased scarf on top of the rack and place a small folded towel on top of the scarf. Make sure that neither the scarf or the towel touches the sides or the top of the pot. Heat the water so that it steams and not boils. Place a lid on top and tilt the top every 10 minutes or so to send the condensation to the side and back to the bottom of the pot.NOTE: It is very important that water does not touch the scarf. The colors are set by the heat from the steam. Water will cause the colors to run and could ruin all your work. Make sure the towel does not touch the top of the lid, that the water does not boil and splash up on the scarf, or have condensation dropping from the lid on to the scarf.
- Steam on your stovetop for about 2.5 to 3 hours. Lift lid, take off the towel, and remove the scarf. Let it cool down before unwrapping it. It will look very wrinkled, but you’ll be able to tell if it set properly.
- Put on plastic gloves and gently hand wash in cold water using a very small amount of professional textile detergent. The water will become a solid color from excess dye. Rinse with cold water several times to get out the detergent and excess dye until the water is almost clear. Remove the gloves.
- Either form a ball and gently squeeze or roll in old towels to get out excess water. Dry flat or on a padded hanger. I use a drying rack with a fan in front of it. Iron on reverse side on silk setting when silk is dry or just very slightly damp. You may even want to place a sheet of newsprint between the silk and the iron to prevent any color transfer or left over gutta transfer which can happen. I highly recommend doing this. When the iron is unplugged and has cooled off, be sure to wipe it with a slightly damp sponge to remove any possible color residue if you haven’t used the newsprint. For more information on the care of silk please visit this link: http://www.apparelsearch.com/Education/Ohio_State_Clothing_Education/Silk_fabric_care.htm.
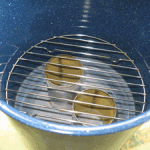
A 10 inch tall pot is filled with 1.5 to 1.75 inches of water. A 10 inch rack is placed on top of cans with the ends removed.
Source for supplies: There are several suppliers for dying and painting silk. I get mine from Dharma Trading Company. Here is a link to their site: http://www.dharmatrading.com. They have a wide range of supplies, good prices and excellent customer service.
Supplies You’ll Need
Blank pre-hemmed 100% silk scarves
Stretcher(s)
Pins for silk/stretcher
Soft pencil
Sumi or watercolor brushes
At least six 3.5 bottles of Sennelier Tinfix dyes
Aqua gutta
Eye dropper
Watercolor trays and plastic cups for dyes and water
Paper towels
Plastic squeeze bottle for gutta
Metal tip to go on plastic bottle. I use a #7.
Salt and rubbing alcohol for different effects
Professional fabric detergent
Rubber gloves
Plastic tub to wash scarves in sink
Drying rack
Newsprint
10” tall 10.5” wide pot
10” round cooling rack
Small cotton hand towel
Muslin (thin 100% cotton) cut into 33” x 64” strips for 60” oblong scarves. You may want to have about 6 on hand for rotation before you have to throw them in the washer.
Tye Dying Silk Scarves
Supplies: You will need the same supplies as you would for painting silk scarves except for a stretcher (in most cases). In addition to the usual suspects (see section on supplies) you’ll need some rubber bands and plastic grocery or garbage bags to protect your working/drying surfaces.
The Process: The process is a little more simplistic than the usual silk painting using a stretcher in that you won’t need one. Instead, you’ll be folding your scarf, securing it with 2 to 4 rubber bands and placing it on plastic grocery bags or garbage bags to protect the working surface. To find spiral or accordion fold patterns please go to a website that specializes in tye dye instructions.
The most difficult is actually trying to fold the silk and get it to stay in place since it is slippery by nature. It took me as many as 15 tries before I was finally happy with the fold or the fold didn’t slip and come undone. You should use at least 2 or 3 different colors and work the dye well into the crevices. Paint one side first, flip it over and paint the other side. Let it dry for a day or two and then remove the rubber bands (you might want to wear rubber gloves unless you don’t mind having colorful fingers for a few hours). Part of it may still be damp with dye, so you will need to drape it over something or lay it flat (on a protected surface!) until it is fully dry so you can set the dye as normal.
Some of the areas may have more white in them than you would like if you didn’t saturate the silk with enough dye. You could try adding some dye to those areas, but you will likely get water spots. You could also (unfortunately, here’s where a stretcher comes in) place your scarf on a stretcher and paint a light wash of color on the whole scarf. You could also start off by stretching your scarf and laying down some background colors, letting it dry, removing it, and then proceeding with the tye dye process.

